Light It Up

The final trial of the lighting was done on the 26th June, using the blue LED string lights going up the back, the EL wire threaded through the milk bottles, and then a large camping light placed on the inside of the wave protected inside a plastic blue container, which also casts a nice hue and gives a glow from the inside so the whole wave is illuminated. We also have a smaller light (but is still very powerful) that we may add inside, but this decision will be made when in situ and depending on how dark the car park is.

IMG_8343

The wave in itself is completed, however, we have left a gap in the large sheets of plastic that are sewn onto the sides so we can change the batteries that we will cable tie each time, the pallets we are attaching the wave onto need the top coat of black paint (this will conceal them), nail the frame at the base to the pallets using industrial staples, and also attach the trailing plastic to the pallets. This all has to be done when setting up, on location, so we will have to allow time to make these final adjustments.

Images are our own.

Creating the Structure (finally!!)

We have had so many setbacks in the process of actually forming the wave and the supporting structure. We have had contradicting advice in regards to building an armature, the best materials, whether it would stay up and be safe.
Not having experience with creating a sculpture this size before we have been unsure of which is the best advice to follow! In the end we went ahead and ordered one sheet of welding mesh, as this could be used in most of the possible ways of creating the wave, and we are running out of time and have to start the construction. (we can’t wait to get past all the struggles and actually see the installation coming together!).
We figured it would help us to see if the form would work, and be steady enough, by bending the welding mesh back onto itself and holding it in shape temporarily with rope and thin wire. (pictured.)

It was a real relief to return to our original idea for the armature and see that this structure resembled a wave!

As this design requires less plastics, the welding mesh makes up a lot of the form, it would save us a lot of time in trips to the recycling centre and washing of bottles. The mesh also creates a strong base for the installation.

As we were all happy with this structure we had to weld it together! I (Rachael) was a bit tentative at the initial thought of welding myself as was Bethan,  but I wanted to give it a go, and I figured it would be much more satisfying if we did all of the required tasks to form our wave, and welding was one of these things!  It turned out to be so much fun and was exciting to see our wave coming together! Below are the images of us preparing to and doing the welding, along with the settings of the welding machine.

(Note from Bethan: The welding has been my most memorable part of this. I was also feeling a bit freaked about welding, but it was empowering and lots of fun! A skill hopefully we will be able to use again in the future.)

Images are our own. In preparation for Light Nelson 2016

It’s Begining!!!

After many brainstorms to try to resolve the issues we are having with choosing the right structure to hold our Light Nelson installation, we ordered a sheet of welding mesh, planning to create a form 2.5 square and 2 high  and building up plastics to the final width to be 3 by 3 and 2.5 high as a sculptural wave!

We first constructed a Marquette using paper. To do this we measured the paper to scale to represent the welding mesh:

The images above would need two sheets of welding mesh, though this looked like it could work well it would not be within our budget to buy two sheets.

We found that using this method of construction and only one sheet would require a large amount of cutting and welding the mesh, which in turn could weaken the overall structure.

There was still much we had to figure out regarding the structure of the wave and method of construction. We thought it would be good to problem solve these when the mesh arrived.

Below is a mock up of another way we could bend the mesh to form our wave, we felt that this method would work well, and save time. As long as we had sufficient weight to counter balance the weight of the bottles going on.

IMG_8634

The images below show what the steps we took today once the mesh arrived, in the small beginnings of our wave.

Image one shows the welding mesh as is, then the lay out of the bottles placed onto this mesh. The following images show the steel cutters and then the excess welding mesh being cut off. The image 3 shows us turning the edges of the mesh slightly up to make it more potent and more stable for being moved etc.

Also pictured are the amount of remaining bottles after only using what seemed like a few, we are already needing more after only covering one layer of the three meter base.

I also tried an experiment using glue gun to join the bottles, I tested the strength after the glue had dried, and it held very well, with the heavier object still staying attached when suspended or held in mid air.

Images are our own.

‘Big Yellow Bunny’

I came across this massive 13-meter-high work by Dutch installation artist Florentijn Hofman while researching for other artists using heavy materials to create large scaled installations, and the type of armatures they use to keen them stable and balanced. Hofman created this temporary sculpture near St. Nicolai church in the city center, was constructed out of  locally-manufactured shingles, a wooden armature, concrete and metal, with the volunteered  help of 25 craftmens from Örebro, Sweden. He apparently used a wooden armature.

Big-Yellow-Rabbit-Florentijn-Hofman-1

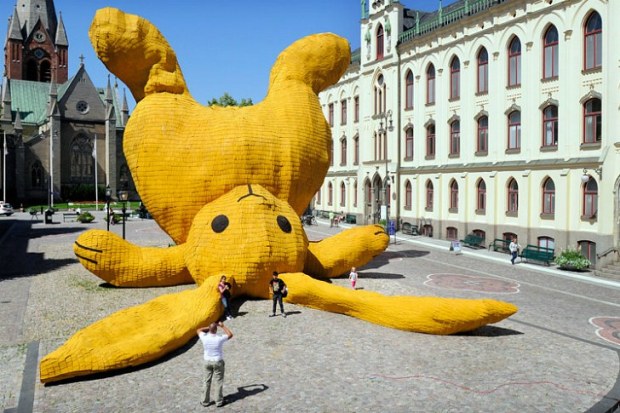
Hofman sees the world as his ‘giant playground‘ and many of his installations are large scale replicas of toys and animals set within very public spaces as a way to challenge the concept of public space. By enlarging the scale of the installation, Hofman changes the viewers’ perspectives of both the installation and the space it sits in. In the case of the Big Yellow Rabbit, Hofman placed the sculpture as though it were dropped from the sky, resting naturally against the Engelbrekt monument. Using these deliberate positioning techniques, Hofman seeks to ask, “What is the use and purpose of public space?”

These images give a good perspective of the huge scale of this massive bunny! I feel we are  used to seeing installations near this size resembling animals, and are often  quite overwhelming and almost threatening. This might have something to do with our minds making a connection with the physics of how heavy the materials look, coupled with the size, we feel as if the installation couldfall onto us. In this work however the angle aids this tension, as it looks unstable, like a child has dropped it and it will soon topple over, however, because we also have a remebrance to this item, or design we feel an instant connection through the recognition through the object.

We want our wave to have to give the audience a feeling of awe, an understanding of the concept, and also the sense of tension in terms of the overwhelming issue of plastics in the oceans, but at the same time not make the viewer uncomfortable.

References:

Some text and information retrieved from,

Meinhold, Bridgette, DesignBoom, and Florentijn Hofman. “Big Yellow Bunny Made From Local Swedish Materials is Easily the Size of a Building! | Inhabitat – Green Design, Innovation, Architecture, Green Building.” Inhabitat | Design For a Better World!. Last modified August 23, 2011. Accessed June 6, 2016. http://inhabitat.com/big-yellow-bunny-made-from-local-swedish-materials-is-easily-the-size-of-a-building/.

Images retrieved from,

Hofman, Florentijn, and Lasse Person. “Stor Gul Kanin (Big Yellow Bunny).” inhabitat.com. 2011. 2011 openART Biennale in Örebro, Sweden. Accessed June 4, 2016. http://inhabitat.com/big-yellow-bunny-made-from-local-swedish-materials-is-easily-the-size-of-a-building/.

Experimentation with Armatures

We decided that it would be a good idea to start experimenting with the form of the wave and the underlying structure. Below are the examples of some maquettes using thin rods. Our first attempt we used a hot glue gun to bind each individual piece, while it held loosely together, it was not ideal and would not be a strong structure that we could work with.

IMG_20160516_135017

(Image 2) After testing the hot glue gun and it not being satisfactory, we decided to try spot welding points of the structure together. We found this to be a lot firmer, and created a very strong armature.

IMG_20160516_134959


A close up of the results of the two different temperature settings on the spot welder.

IMG_20160516_135147

(Image 3 and 4) The two settings tested on the joined piece above. Because of how they were held with being spot welded setting the heat to 1 and 5 worked best, whereas 1 and 6 nearly burnt through the metal. However when welding the corners of the wave structure we had the spot welder set to 1 and 6, as 1 and 5 wasn’t hot enough to go through and join the two pieces of rod at an angle.

IMG_20160516_134928IMG_20160516_134937

Images are our own.