Finished Installation!

To view the installation all lit up please come along to Light Nelson 2016!
Running from the 8th to the 12th of July, 5:30 to 9:30pm, all ages welcome.
Along with this work there will be a wide range of light installations to view and enjoy.

This has been an extremely challenging yet rewarding project to work on, we hope that through this work we are able to bring awareness of the topic to a wider range of the public.

Contextual Statement

“ALL THE KING’S HORSES AND ALL THE KING’S MEN WILL NEVER GATHER UP ALL THE PLASTIC AND PUT THE OCEAN BACK TOGETHER AGAIN.”
– Charles Moore, Marine Researcher

Our environment is our habitat. As a group project for Light Nelson, we have explored the concept of habitat. We decided our focus towards this project should be environmental, highlighting the inundation of plastics in our oceans. The scale of this work is important, to make an impact on the viewer. Synthetic Nature encourage self-reflection, playing on the theme of water. What changes can be made in the way we treat our environment? The light in the work plays a major role in the works concept, here the light will illuminate the issue and lead us in a new direction.

Light It Up

The final trial of the lighting was done on the 26th June, using the blue LED string lights going up the back, the EL wire threaded through the milk bottles, and then a large camping light placed on the inside of the wave protected inside a plastic blue container, which also casts a nice hue and gives a glow from the inside so the whole wave is illuminated. We also have a smaller light (but is still very powerful) that we may add inside, but this decision will be made when in situ and depending on how dark the car park is.

IMG_8343

The wave in itself is completed, however, we have left a gap in the large sheets of plastic that are sewn onto the sides so we can change the batteries that we will cable tie each time, the pallets we are attaching the wave onto need the top coat of black paint (this will conceal them), nail the frame at the base to the pallets using industrial staples, and also attach the trailing plastic to the pallets. This all has to be done when setting up, on location, so we will have to allow time to make these final adjustments.

Images are our own.

Seems used bottles can be put to good use!

It’s ingenious ideas like this one that make me feel more hopeful of the situation with plastics and waste. Not only does it put plastic bottles to good use, it also helps people and for very little cost!

Grey Dhaka worked with volunteers from Grameen Intel Social Business Ltd to create and design the Eco-cooler. It re-uses bottles to cool houses without the use of electricity.


Capture eco cooler

(Image retrieved from Eco Cooler | Grey Advertising APAC | Grameen Intel. (n.d.). Retrieved from http://grey.com/apac/work/key/eco-cooler/id/12475/)


The Deputy General Manager of Grameeen Intel Social Business Ltd, Abdullah Al Mamun says of the design,

“Since most rural homes in Bangladesh are made with corrugated tin, the Eco-Cooler has the power to provide relief to millions of Bangladeshis. We sincerely hope this volunteer effort will make a difference in their lives”

“After initial tests, blueprints of the Eco-Cooler were put up online for everyone to download for free. Raw materials are easily available, therefore, making Eco-Coolers a cost-effective and environmentally-friendly solution”, said Syed Gousul Alam Shaon, Managing Partner and Chief Creative Officer at Grey Dhaka.

Here is a link to the video showing the Eco-Coolers in use.

Brilliant. We can find a way to reduce wastage and in positive ways that help people.


References:

Eco Cooler | Grey Advertising APAC | Grameen Intel. (n.d.). Retrieved from http://grey.com/apac/work/key/eco-cooler/id/12475/

Eco-Cooler | Grey Dhaka unveils world’s first zero-electricity air cooler made from plastic bottles [Video file]. (n.d.). Retrieved from https://www.youtube.com/watch?v=oSbZWNk84F4

Eco-Cooler. (n.d.). Eco-Cooler. Retrieved from http://revolution-green.com/air-conditioner-less-5/


Life Without Plastic – Yes Please!

I recently came across a website for an online store aiming to revolutionize the way we consume plastic waste. Life Without Plastic not only sell most household items, but also are very proactive in promoting new ways to healthier living for the environment, but also those living in it.

There are now many more alternatives to plastic products available. This is due to a growing awareness of the problems associated with plastics. For example, a tremendous amount of media attention has been given to the issues of BPA over the past few years.

Yet, the quality of these alternatives varies significantly.

There are some wonderful new products created with a real concern for quality, health, the environment, and worker conditions. As well, there are other products out there that are unsafe and unethically manufactured.

For example, not all stainless steel is created equal, and as with many things, price is often an indicator of quality. One cannot expect ethical sourcing and quality control measures to be in place for dollar store dishes. Where a product is made can also provide clues about its quality. That is why we indicate the country of origin – as well as all ingredients – in the description of every single product we sell

chantal_and_jay_300

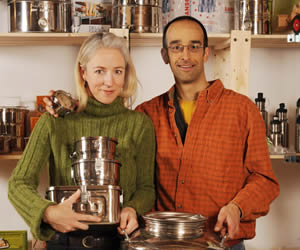
Co-founders & co-owners Chantal Plamondon and Jay Sinha say about their website;

“We are activists for a plastic-free planet working hard to bring you safe, high quality, ethically-sourced, Earth friendly alternatives to plastic products. We are also committed to raising awareness about plastics issues by providing solid science- and experience-based information and showing people, one person at a time, the beauty and simplicity of a life without plastic.”
References:

Life Without Plastic, Chantal Plamondon, and Jay Sinha. “Plastic-Free Products by Plastic Pollution Coalition (PPC).” Life Without Plastic Your One-Stop Shop for Plastic-Free Products. Last modified 2015. http://www.lifewithoutplastic.com/store/plastic-pollution-coalition.html.

Life Without Plastic, Chantal Plamondon, and Jay Sinha. “The Life Without Plastic Story | Bottles to Containers to Plastic Free Living.” Life Without Plastic  Your One-Stop Shop for Plastic-Free Products. Last modified 2015. http://www.lifewithoutplastic.com/store/our_story.

Photo by Mike Beedell http://www.mikebeedellphoto.ca/

Image retrieved from, Beedell, Mike, and http://www.mikebeedellphoto.ca/. “Chantal & Jay – Co-Founders & Co-Owners.” http://www.mikebeedellphoto.ca/ and http://www.lifewithoutplastic.com/store/our_story#.V2-2KKKrNf4. 2015. Accessed June 26, 2016. http://www.lifewithoutplastic.com/store/our_story#.V2-2KKKrNf4.

Creating the Crest

When brainstorming early in the process of creating our wave, the idea was to use not only plastic bottles, but a variety of plastics as the consumption of all plastics types, not only bottles, that invade the natural habitat of the oceans. One of the best ways of using other plastics is on the crest of the wave, where bubble wrap has been used to resemble the white foam that large waves create as they crash. We want to create a sense of our plastic wave coming down or over the viewer as it creates a simple direct link to the oceans plastic pollution.


We attached a layer of bubble wrap to the front of the wave. This is the crest of the wave where the white lights are placed. This catches the light and creates a really amazing frothy looking front to our wave. We attached the bubble wrap using fishing wire to the wire mesh frame. Threading the lights within the bubble wrap will hopefully protect them a bit from the elements.

We have also incorporated thick industrial plastic bags by sewing them in with nylon and a tapestry needle to hide the mesh frames on the inside, through the middle behind the milk bottles, and then also at the sides to join the front and back of the wave. Sewing the bubble wrap onto the front was easy enough compared to most of the wiring required in this project! However, threading the plastic behind the milk bottles was quite challenging, as by this stage all the other bottles had been strung onto the structure, which made it difficult to get right into the centre to attach the plastic sheets.

Image are our own.


The Second Layer

After completing the first layer we attached the blue LED string lights onto the wave using cable ties to secure them to the bottles creating lines going up and down the wave.
Just before attaching them we measured out the length of the lights in relation to the size of the top of the wave (which is roughly 1.9h by 2.5w). We discovered we would need two more sets of string lights to cover and create the aesthetic view we wanted to achieve. With these on we continued to attach the second layer of bottles over the top of the lights. Attaching them using the same method as the first layer.

Once the back of the curve was finished, we were able to move on to attaching the front of the wave. We used milk bottles at the very front as these diffused the light from the EL wire and the light that would go inside the wave.

We threaded the milk bottles the same way as the other bottles, however, we also threaded the EL wire through them before attaching to the structure. This way the wire lit up more of the bottles and was easier to secure in the required places.


Its dark, cold and raining in the images above. But the wave must go on! Many bits of chocolate have been used in the making of this wave, as fuel for the makers 😉

Images are our own.

It’s Coming Together!

The designs of how we would form the wave was done in stages, as most of the elements could not be created without one of the others being completed first. These images are of the first layer being wired to the frame, and also the rows being prepared to be temporarily cello taped together then inserted with thin wire, punched with small holes at each end to be wired through, and then finally go onto the welding mesh.
In the background of most of these images you can see boxes and bags, these are all filled to nearly overflowing with the prepared plastic bottles, sorted in like with like, washed in the boxes, unwashed still in the bags, and then another set of stacked boxes with bottles with the base cut off and then yet another box filled with these bases.

As the process of the actual brainstorming and creation of the wave structure has been so time-consuming, this held up being able to see which lights would be most visually effective, so once we had a few of the first row on the top layer of the wave completed, (and using a little imagination of how it would look with another layer on) we decided we just had to experiment.

In the top images we thread some of the EL wire through the frame at the front, with half a row of milk bottles on to see how they would soften the opacity of the lines the EL wire created. We also thought that the blue LED string lights created strips that were too vivid and made one lose the effects of the wave as a whole, however we thought this would change after we attached the second layer of bottles onto the top of the wave.
Having the lights between the two layers of bottles softens the effect of them, emphasising the wave form and bottles, as opposed to distracting the viewer from them.

Images are our own.

Creating the Structure (finally!!)

We have had so many setbacks in the process of actually forming the wave and the supporting structure. We have had contradicting advice in regards to building an armature, the best materials, whether it would stay up and be safe.
Not having experience with creating a sculpture this size before we have been unsure of which is the best advice to follow! In the end we went ahead and ordered one sheet of welding mesh, as this could be used in most of the possible ways of creating the wave, and we are running out of time and have to start the construction. (we can’t wait to get past all the struggles and actually see the installation coming together!).
We figured it would help us to see if the form would work, and be steady enough, by bending the welding mesh back onto itself and holding it in shape temporarily with rope and thin wire. (pictured.)

It was a real relief to return to our original idea for the armature and see that this structure resembled a wave!

As this design requires less plastics, the welding mesh makes up a lot of the form, it would save us a lot of time in trips to the recycling centre and washing of bottles. The mesh also creates a strong base for the installation.

As we were all happy with this structure we had to weld it together! I (Rachael) was a bit tentative at the initial thought of welding myself as was Bethan,  but I wanted to give it a go, and I figured it would be much more satisfying if we did all of the required tasks to form our wave, and welding was one of these things!  It turned out to be so much fun and was exciting to see our wave coming together! Below are the images of us preparing to and doing the welding, along with the settings of the welding machine.

(Note from Bethan: The welding has been my most memorable part of this. I was also feeling a bit freaked about welding, but it was empowering and lots of fun! A skill hopefully we will be able to use again in the future.)

Images are our own. In preparation for Light Nelson 2016

Problem Solving the Structure

After creating what would make up half a layer of plastic bottles for the wave using the brick formation, it became apparent that this method would require even more bottles than the hundreds we had already accumulated; to form the scale of installation we are aiming for. This also meant a lot more washing of bottles than we had expected.

IMG_8353
We also had concerns as to the strength of just having plastic layered, if it got windy, rainy, it could easily blow away, sway dangerously, and even fill with water and become too heavy and collapse on itself.
The test we had created by lining the bottles up and joining them together with sellotape caved when lifted, and after being rained on completely came apart, as the glues came unstuck. This confirmed our concerns of the issues that would arise when making the wave this way.

We also bought a tube of No More Nails multipurpose/industrial glue that we had checked would stick on plastic, but again, if we formed the wave out of plastics alone, without the underlying structure, this would require mass amounts of glue, and also consume a lot of time waiting for the glue to dry before adding another layer.

We then tried cutting the base off the bottles and slotting them together where possible with similar sizes and designs. This proved quite effective, as they not only fitted together well, but also had some give to create the curved form in our design.
When trying this we found how well it worked, and even though I had the idea when inserting the plastics together to have them running horizontal, when we discovered how they curved so well it was the obvious choice to string them in rows vertically.

We found some flexible, aluminium wire which we strung through the bottles, and then again at two points by punching holes into the plastic to fortify it.
We achieved this by using a stick of dry bamboo and using it like a giant needle, tying the wire to one end and threading it through the bottles.

This created the desired curve and worked well, this is how we are forming the rest of the top of our wave.

Nice curves wave.

Images are our own.